Google Earth KML/KMZ Workflow Guide
Make Google Earth fit seamlessly into your CAD workflow (AutoCAD, Civil 3D, BricsCAD and other CAD tools) with Plex-Earth
If you ever had to explain a CAD drawing to someone who doesn’t speak CAD, or to a cross-functional team that all have their own interpretation of the site, this article is for you.
We can all agree “imagine the road here” is not something you want to say out loud in a stakeholder meeting, but getting the clarity on where the design sits in the real world is impossible without the right visual aid.
That’s where Google Earth helps. It’s the perfect tool for:
Quick context checks, so you can make more confident decisions or plan alternatives
Fast reviews of a site with a simple overlay that people can understand at a glance
Lightway sharing, because one KMZ file beats random screenshots in a long email thread
In other words, Google Earth gives you a shared, visual context of the ground surface, and KML/KMZ is the bridge format that makes it all possible.

Two ways to get there: manual vs. the Plex-Earth workflow
The manual route (possible, but it depends on your setup)
If you’re in Civil 3D, Autodesk gives you an Export KML Wizard (KML/KMZ) with steps for picking objects, handling georeferencing, and even “nudging” placement. However, in this manual workflow, the 3D object export leaves a lot to be desired.
For example, if you have 3D objects with textures and enable the Export Materials option, the 2D objects will not display properly in Google Earth.
If you’re in AutoCAD Map 3D toolset, you can also export KML/KMZ via Map workflows (though teams often describe it as a bit temperamental in the real world, especially across different installs/settings).
In other setups, it turns into a mix of extra steps, different commands, and “wait, why is this missing on this machine?”
And while manual process is possible under certain circumstances, the very nature of it makes the workflow prone to errors (especially when it comes to altitude), and with that, it can turn into a timesuck really fast.
That’s why many teams use Plex-Earth even when they technically have a manual option: not because the manual route is impossible, but because a consistent, repeatable workflow saves time (and sanity), especially when you’re doing this across projects and people.
The Plex-Earth route (fewer steps, repeatable workflow)
Plex-Earth is useful when you want the KML/KMZ workflow to feel like a normal CAD task, and not a special procedure you have to remember.
Teams typically choose Plex-Earth because it helps with:
Speed: copy & paste KML/KMZ objects from Google Earth to AutoCAD for a quick start.
Consistency across tools: the same workflow in AutoCAD/Civil 3D and BricsCAD, rather than “it depends on what you have installed.”
Separate commands for normal (2D) and 3D KMZ exports for more accuracy and precision
More customization: group objects by layer, precise zoom, include text objects and points, choose different lineweights, etc.
Repeatability: import/export is handled inside CAD, with clear prompts and fewer moving parts.
Fewer “why is this floating?” moments: altitude handling is part of the export flow (clamped/relative/absolute), so the output is easier to control.
Overall cleaner sharing: you can tune how exports look (grouping, placemarks, lineweights) and even include object info, making Google Earth more self-explanatory for reviewers.
If you’ve ever had to do the same “export → check → tweak → export again” loop more than once, you already understand the appeal.

Want to jump straight to the juicy part?
Check out our detailed walkthrough (with images) on how to get your KML/KMZ (boundary, route, placemarks) into CAD, or your CAD geometry displayed in Google Earth with Plex-Earth.
KML vs KMZ: what you need to know (quickly)
If you’re new to this concept, here’s a crash course to level the field.
KML is the standard format.
KMZ is the packaged/zipped version (handy for sharing and bundling content together).
What transfers well:
Lines, boundaries, polylines
Polygons
Placemarks and basic descriptions
What to not expect:
A perfect “everything survives round-trip” experience, like a native CAD format
Instant render in Google Earth for heavier models, due to their limited rendering capabilities
The 3 decisions that make or break the result
1) Direction matters
Import and export are different jobs:
Import: “Bring context into CAD so I can design.”
Export: “Bring CAD into Google Earth so others can understand.”
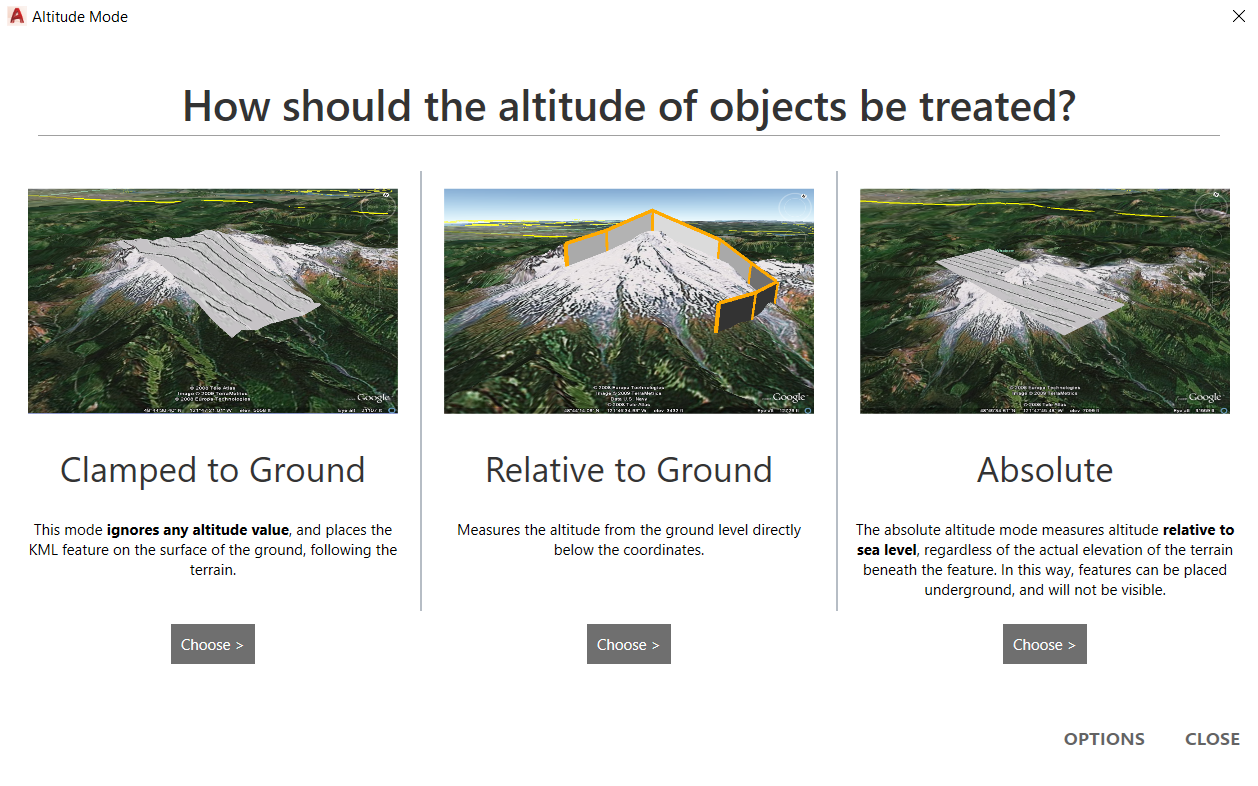
2) Altitude mode (the reason things float, sink, or disappear)
Altitude handling is the most common cause of “this looks wrong” moments.
You’ll usually choose one of:
Clamped to ground: best default for quick overlays
Relative to ground: useful when height above terrain matters
Absolute: use when your elevation reference is intentional and verified
[Image of altitude picking - there’s a solid one already in the website asset library]
3) 2D export vs 3D KMZ
Use Export KML/KMZ for quick overlays and sharing linework
Use Export 3D KMZ when visuals matter (materials, surfaces, textures)
Expectation-setting that saves everyone time: 3D KMZ is best treated as “for viewing/presenting” rather than a clean round-trip back into CAD.
60-second workflow overview
These are intentionally short. For the exact prompts and UI steps, use the support guide or watch the video walkthrough below.
Import overview: Google Earth → CAD
Open the KML tools
Import KML/KMZ
Zoom to imported elements
Start working from the imported geometry
Export overview: CAD → Google Earth
Select the CAD objects you want to share
Export KML/KMZ
Choose altitude mode
Save
Open in Google Earth
Make your exports stakeholder-friendly (without extra work)
If the goal is “someone opens this and immediately gets it,” spend a couple of minutes on export settings.
You can customize things like:
placemark behavior and appearance
line and polygon readability
grouping and display preferences
Learn more about Plex-Earth KML/KMZ exports customization →
Useful commands/hotkeys for reference →
Rapid fire troubleshoot (symptom → fix)
If your import or export doesn’t look right in your favorite CAD tool or Google Earth, start with these quick checks before you redo the whole workflow.
Export floating or buried: revisit altitude mode first.
Nothing shows after import: zoom in on the imported elements and confirm the file content.
3D KMZ looks empty: treat 3D KMZ as a viewing/presentation format and check known limitations.
Export looks shifted (not lining up with the site): verify the drawing is correctly georeferenced/using the expected coordinate system, then re-export.
Export is hard to see (too thin, low contrast, messy): tweak export styling (placemarks, line/polygon appearance, grouping) using the export customization options.
Frequently asked questions:
Which CAD tools does this apply to?
This guide is written for CAD users working in AutoCAD-based tools (including Civil 3D), and BricsCAD, using Plex-Earth’s KML/KMZ workflow.
Can I do this without Plex-Earth?
Often yes, depending on your CAD environment and installed toolsets. The trade-off is that the steps and availability can vary across setups, and it’s usually less repeatable across a team.
Which altitude mode should I start with?
For quick overlays and review, start with clamped-to-ground behavior. Then adjust if you have a specific elevation intent.
Can I export only part of my drawing (specific layers or objects)?
Yes. You can export selected objects rather than the whole drawing, which is usually the cleanest way to share just what a reviewer needs in Google Earth. If you want more control over how things are grouped and displayed (for example, by layer, placemarks, or line appearance), use the export customization options.
How teams use this in practice
Civil engineering
In civil workflows, the Google Earth step is usually about validating alignment and communicating intent fast, not exporting an entire drawing.
A reliable pattern is building a compact “review pack” in CAD: export the alignment/centerline, a boundary as a closed polyline (so it reads as an area in Google Earth), and only the handful of points/features that affect decisions (tie-ins, crossings, structures).
Keep altitude handling simple. Start clamped-to-ground for quick overlay checks, then move to relative/absolute only when you explicitly need elevation behavior. The practical win is consistency: export the same set of layers/objects every time so reviewers always know what they’re looking at.
Solar energy
Solar teams typically use KMZ exports to speed up feasibility reviews and stakeholder alignment.
The export that works best is intentionally minimal: boundary + exclusion areas + access routes + array extents, prepared as clean, closed shapes where appropriate.
Instead of relying on “notes,” the actionable move is naming: give exported objects short, recognizable names that match internal language (Block A, Setback Zone, Access Road), so the file is readable when someone clicks around. The goal is a KMZ that supports “yes/no/adjust” decisions, not one that tries to carry the whole CAD drawing.
Wind energy
Wind projects benefit from Google Earth when you need spatial context quickly: terrain, access, spacing, and whether the layout makes sense to non-CAD reviewers.
A practical approach is exporting turbine locations and access geometry as a clean set of objects, then using altitude mode deliberately so the overlay behaves predictably in the terrain view.
Keep naming consistent, for example, T-01, T-02, Crane Pad, Access Spur, so reviewers can reference specific elements without back-and-forth. If a review turns into “what am I looking at,” you probably exported too much.
Oil & gas
Oil & gas workflows often revolve around corridor-scale coordination, where context matters more than drafting detail. The KMZ that gets used is usually a simplified corridor centerline plus key points like crossings, valves, and facilities, with geometry prepared in CAD so it is clear at Google Earth scale.
Naming matters here too. Consistent IDs for tie-ins and crossings make feedback actionable, like “move Crossing-03,” instead of vague, like “that one by the road.” This is also where repeating the same export recipe across projects saves real time.
Telecommunications
Telecom reviews are often about fast orientation and fewer misunderstandings.
Export sites, towers, or rooftops as points and name them in a way that matches how the team communicates, like Site ID plus a location shorthand, then export only the geometry needed for the conversation.
The trick is restraint. Keep the export lightweight and legible at typical viewing heights in Google Earth. When reviewers can quickly identify which site and which element they are looking at, the feedback loop gets dramatically shorter.
Utilities
Utilities teams often run this workflow as a loop: export for routing review, adjust in CAD, export again for confirmation.
Long linear assets benefit from exporting only what supports routing decisions, usually centerline or route geometry plus the few constraints that materially change the path, like crossings, easements, and exclusion areas, prepared as clean geometry so it reads clearly in Google Earth.
Naming exported objects consistently helps during review, like Segment-B or Crossing-05, even when feedback comes from people who never open CAD.
To wrap things up…
Google Earth isn’t “just a viewer.” For CAD teams, it’s a fast way to add context, validate placement, and communicate design intent.
You can absolutely do KML/KMZ workflows manually in some CAD setups. Plex-Earth just makes it easier to do consistently.
Especially when you need to repeat it across projects and people.